Invention: Difference between revisions
TheDiabeto (talk | contribs) |
TheDiabeto (talk | contribs) No edit summary |
||
| Line 163: | Line 163: | ||
|5 | |5 | ||
|[[File:Solrot's hood T1.png|30x30px|frameless]] | |[[File:Solrot's hood T1.png|30x30px|frameless]] | ||
|Solrot's hood | |[[Solrot's hood T1]] | ||
|[[File:Solrot's hood.png|frameless|30x30px]] | |[[File:Solrot's hood.png|frameless|30x30px]] | ||
|[[Solrot's hood]] | |[[Solrot's hood]] | ||
| Line 173: | Line 173: | ||
|5 | |5 | ||
|[[File:Solrot's tunic T1.png|30x30px|frameless]] | |[[File:Solrot's tunic T1.png|30x30px|frameless]] | ||
|Solrot's tunic | |[[Solrot's tunic T1]] | ||
|[[File:Solrot's tunic.png|frameless|31x31px]] | |[[File:Solrot's tunic.png|frameless|31x31px]] | ||
|[[Solrot's tunic]] | |[[Solrot's tunic]] | ||
| Line 183: | Line 183: | ||
|5 | |5 | ||
|[[File:Solrot's leggings T1.png|30x30px|frameless]] | |[[File:Solrot's leggings T1.png|30x30px|frameless]] | ||
|Solrot's leggings | |[[Solrot's leggings T1]] | ||
|[[File:Solrot's leggings.png|frameless|30x30px]] | |[[File:Solrot's leggings.png|frameless|30x30px]] | ||
|[[Solrot's leggings]] | |[[Solrot's leggings]] | ||
| Line 193: | Line 193: | ||
|5 | |5 | ||
|[[File:Solrot's greatsword T1.png|31x31px|frameless]] | |[[File:Solrot's greatsword T1.png|31x31px|frameless]] | ||
|Solrot's greatsword | |[[Solrot's greatsword T1]] | ||
|[[File:Solrot's greatsword.png|frameless|32x32px]] | |[[File:Solrot's greatsword.png|frameless|32x32px]] | ||
|[[Solrot's greatsword]] | |[[Solrot's greatsword]] | ||
| Line 203: | Line 203: | ||
|5 | |5 | ||
|[[File:Solrot's crossbow T1.png|32x32px|frameless]] | |[[File:Solrot's crossbow T1.png|32x32px|frameless]] | ||
|Solrot's crossbow | |[[Solrot's crossbow T1]] | ||
|[[File:Solrot's crossbow.png|frameless|32x32px]] | |[[File:Solrot's crossbow.png|frameless|32x32px]] | ||
|[[Solrot's crossbow]] | |[[Solrot's crossbow]] | ||
| Line 213: | Line 213: | ||
|5 | |5 | ||
|[[File:Solrot's staff T1.png|30x30px|frameless]] | |[[File:Solrot's staff T1.png|30x30px|frameless]] | ||
|Solrot's staff | |[[Solrot's staff T1]] | ||
|[[File:Solrot's staff.png|frameless|30x30px]] | |[[File:Solrot's staff.png|frameless|30x30px]] | ||
|[[Solrot's staff]] | |[[Solrot's staff]] | ||
| Line 235: | Line 235: | ||
|15 | |15 | ||
|[[File:Solrot's hood T2.png|30x30px|frameless]] | |[[File:Solrot's hood T2.png|30x30px|frameless]] | ||
|Solrot's hood | |[[Solrot's hood T2]] | ||
|[[File:Solrot's hood T1.png|frameless|30x30px]] | |[[File:Solrot's hood T1.png|frameless|30x30px]] | ||
|Solrot's hood | |[[Solrot's hood T1]] | ||
|[[File:Titanium claw.png]] | |[[File:Titanium claw.png]] | ||
|[[Titanium claw]] | |[[Titanium claw]] | ||
| Line 245: | Line 245: | ||
|15 | |15 | ||
|[[File:Solrot's tunic T2.png|30x30px|frameless]] | |[[File:Solrot's tunic T2.png|30x30px|frameless]] | ||
|Solrot's tunic | |[[Solrot's tunic T2]] | ||
|[[File:Solrot's tunic T1.png|frameless|30x30px]] | |[[File:Solrot's tunic T1.png|frameless|30x30px]] | ||
|Solrot's tunic | |[[Solrot's tunic T1]] | ||
|[[File:Titanium claw.png]] | |[[File:Titanium claw.png]] | ||
|[[Titanium claw]] | |[[Titanium claw]] | ||
| Line 255: | Line 255: | ||
|15 | |15 | ||
|[[File:Solrot's leggings T2.png|30x30px|frameless]] | |[[File:Solrot's leggings T2.png|30x30px|frameless]] | ||
|Solrot's leggings | |[[Solrot's leggings T2]] | ||
|[[File:Solrot's leggings T1.png|frameless|30x30px]] | |[[File:Solrot's leggings T1.png|frameless|30x30px]] | ||
|Solrot's leggings | |[[Solrot's leggings T1]] | ||
|[[File:Titanium claw.png]] | |[[File:Titanium claw.png]] | ||
|[[Titanium claw]] | |[[Titanium claw]] | ||
| Line 265: | Line 265: | ||
|15 | |15 | ||
|[[File:Solrot's greatsword T2.png|31x31px|frameless]] | |[[File:Solrot's greatsword T2.png|31x31px|frameless]] | ||
|Solrot's greatsword | |[[Solrot's greatsword T2]] | ||
|[[File:Solrot's greatsword T1.png|frameless|31x31px]] | |[[File:Solrot's greatsword T1.png|frameless|31x31px]] | ||
|Solrot's greatsword | |[[Solrot's greatsword T1]] | ||
|[[File:Titanium claw.png]] | |[[File:Titanium claw.png]] | ||
|[[Titanium claw]] | |[[Titanium claw]] | ||
| Line 275: | Line 275: | ||
|15 | |15 | ||
|[[File:Solrot's crossbow T2.png|32x32px|frameless]] | |[[File:Solrot's crossbow T2.png|32x32px|frameless]] | ||
|Solrot's crossbow | |[[Solrot's crossbow T2]] | ||
|[[File:Solrot's crossbow T1.png|frameless|32x32px]] | |[[File:Solrot's crossbow T1.png|frameless|32x32px]] | ||
|Solrot's crossbow | |[[Solrot's crossbow T1]] | ||
|[[File:Titanium claw.png]] | |[[File:Titanium claw.png]] | ||
|[[Titanium claw]] | |[[Titanium claw]] | ||
| Line 285: | Line 285: | ||
|15 | |15 | ||
|[[File:Solrot's staff T2.png|30x30px|frameless]] | |[[File:Solrot's staff T2.png|30x30px|frameless]] | ||
|Solrot's staff | |[[Solrot's staff T2]] | ||
|[[File:Solrot's staff T1.png|frameless|30x30px]] | |[[File:Solrot's staff T1.png|frameless|30x30px]] | ||
|Solrot's staff | |[[Solrot's staff T1]] | ||
|[[File:Titanium claw.png]] | |[[File:Titanium claw.png]] | ||
|[[Titanium claw]] | |[[Titanium claw]] | ||
| Line 307: | Line 307: | ||
|30 | |30 | ||
|[[File:Solrot's hood T3.png|30x30px]] | |[[File:Solrot's hood T3.png|30x30px]] | ||
|Solrot's hood | |[[Solrot's hood T3]] | ||
|[[File:Solrot's hood T2.png|frameless|30x30px]] | |[[File:Solrot's hood T2.png|frameless|30x30px]] | ||
|Solrot's hood | |[[Solrot's hood T2]] | ||
|[[File:Colossal fang.png]] | |[[File:Colossal fang.png]] | ||
|[[Colossal fang]] | |[[Colossal fang]] | ||
| Line 317: | Line 317: | ||
|30 | |30 | ||
|[[File:Solrot's tunic T3.png|30x30px|frameless]] | |[[File:Solrot's tunic T3.png|30x30px|frameless]] | ||
|Solrot's tunic | |[[Solrot's tunic T3]] | ||
|[[File:Solrot's tunic T2.png|frameless|30x30px]] | |[[File:Solrot's tunic T2.png|frameless|30x30px]] | ||
|Solrot's | |[[Solrot's tunic T2]] | ||
|[[File:Colossal fang.png]] | |[[File:Colossal fang.png]] | ||
|[[Colossal fang]] | |[[Colossal fang]] | ||
| Line 327: | Line 327: | ||
|30 | |30 | ||
|[[File:Solrot's leggings T3.png|30x30px|frameless]] | |[[File:Solrot's leggings T3.png|30x30px|frameless]] | ||
|Solrot's leggings | |[[Solrot's leggings T3]] | ||
|[[File:Solrot's leggings T2.png|frameless|30x30px]] | |[[File:Solrot's leggings T2.png|frameless|30x30px]] | ||
|Solrot's leggings | |[[Solrot's leggings T2]] | ||
|[[File:Colossal fang.png]] | |[[File:Colossal fang.png]] | ||
|[[Colossal fang]] | |[[Colossal fang]] | ||
| Line 337: | Line 337: | ||
|30 | |30 | ||
|[[File:Solrot's greatsword T3.png|31x31px|frameless]] | |[[File:Solrot's greatsword T3.png|31x31px|frameless]] | ||
|Solrot's greatsword | |[[Solrot's greatsword T3]] | ||
|[[File:Solrot's greatsword T2.png|frameless|31x31px]] | |[[File:Solrot's greatsword T2.png|frameless|31x31px]] | ||
|Solrot's greatsword | |[[Solrot's greatsword T2]] | ||
|[[File:Colossal fang.png]] | |[[File:Colossal fang.png]] | ||
|[[Colossal fang]] | |[[Colossal fang]] | ||
| Line 347: | Line 347: | ||
|30 | |30 | ||
|[[File:Solrot's crossbow T3.png|31x31px|frameless]] | |[[File:Solrot's crossbow T3.png|31x31px|frameless]] | ||
|Solrot's crossbow | |[[Solrot's crossbow T3]] | ||
|[[File:Solrot's crossbow T2.png|frameless|32x32px]] | |[[File:Solrot's crossbow T2.png|frameless|32x32px]] | ||
|Solrot's crossbow | |[[Solrot's crossbow T2]] | ||
|[[File:Colossal fang.png]] | |[[File:Colossal fang.png]] | ||
|[[Colossal fang]] | |[[Colossal fang]] | ||
| Line 357: | Line 357: | ||
|30 | |30 | ||
|[[File:Solrot's staff T3.png|30x30px|frameless]] | |[[File:Solrot's staff T3.png|30x30px|frameless]] | ||
|Solrot's staff | |[[Solrot's staff T3]] | ||
|[[File:Solrot's staff T2.png|frameless|30x30px]] | |[[File:Solrot's staff T2.png|frameless|30x30px]] | ||
|Solrot's staff | |[[Solrot's staff T2]] | ||
|[[File:Colossal fang.png]] | |[[File:Colossal fang.png]] | ||
|[[Colossal fang]] | |[[Colossal fang]] | ||
| Line 399: | Line 399: | ||
|45 | |45 | ||
|[[File:Solrot's hood T4.png|30x30px|frameless]] | |[[File:Solrot's hood T4.png|30x30px|frameless]] | ||
|Solrot's hood | |[[Solrot's hood T4]] | ||
|[[File:Solrot's hood T3.png|frameless|30x30px]] | |[[File:Solrot's hood T3.png|frameless|30x30px]] | ||
|Solrot's hood | |[[Solrot's hood T3]] | ||
|[[File:Glowing pyramid.png]] | |[[File:Glowing pyramid.png]] | ||
|[[Glowing pyramid]] | |[[Glowing pyramid]] | ||
| Line 409: | Line 409: | ||
|45 | |45 | ||
|[[File:Solrot's tunic T4.png|31x31px|frameless]] | |[[File:Solrot's tunic T4.png|31x31px|frameless]] | ||
|Solrot's tunic | |[[Solrot's tunic T4]] | ||
|[[File:Solrot's tunic T3.png|frameless|30x30px]] | |[[File:Solrot's tunic T3.png|frameless|30x30px]] | ||
|Solrot's tunic | |[[Solrot's tunic T3]] | ||
|[[File:Glowing pyramid.png]] | |[[File:Glowing pyramid.png]] | ||
|[[Glowing pyramid]] | |[[Glowing pyramid]] | ||
| Line 419: | Line 419: | ||
|45 | |45 | ||
|[[File:Solrot's leggings T4.png|30x30px|frameless]] | |[[File:Solrot's leggings T4.png|30x30px|frameless]] | ||
|Solrot's leggings | |[[Solrot's leggings T4]] | ||
|[[File:Solrot's leggings T3.png|frameless|30x30px]] | |[[File:Solrot's leggings T3.png|frameless|30x30px]] | ||
|Solrot's leggings | |[[Solrot's leggings T3]] | ||
|[[File:Glowing pyramid.png]] | |[[File:Glowing pyramid.png]] | ||
|[[Glowing pyramid]] | |[[Glowing pyramid]] | ||
| Line 429: | Line 429: | ||
|45 | |45 | ||
|[[File:Solrot's greatsword T4.png|32x32px|frameless]] | |[[File:Solrot's greatsword T4.png|32x32px|frameless]] | ||
|Solrot's greatsword | |[[Solrot's greatsword T4]] | ||
|[[File:Solrot's greatsword T3.png|frameless|31x31px]] | |[[File:Solrot's greatsword T3.png|frameless|31x31px]] | ||
|Solrot's greatsword | |[[Solrot's greatsword T3]] | ||
|[[File:Glowing pyramid.png]] | |[[File:Glowing pyramid.png]] | ||
|[[Glowing pyramid]] | |[[Glowing pyramid]] | ||
| Line 439: | Line 439: | ||
|45 | |45 | ||
|[[File:Solrot's crossbow T4.png|32x32px|frameless]] | |[[File:Solrot's crossbow T4.png|32x32px|frameless]] | ||
|Solrot's crossbow | |[[Solrot's crossbow T4]] | ||
|[[File:Solrot's crossbow T3.png|frameless|31x31px]] | |[[File:Solrot's crossbow T3.png|frameless|31x31px]] | ||
|Solrot's crossbow | |[[Solrot's crossbow T3]] | ||
|[[File:Glowing pyramid.png]] | |[[File:Glowing pyramid.png]] | ||
|[[Glowing pyramid]] | |[[Glowing pyramid]] | ||
| Line 449: | Line 449: | ||
|45 | |45 | ||
|[[File:Solrot's staff T4.png|30x30px|frameless]] | |[[File:Solrot's staff T4.png|30x30px|frameless]] | ||
|Solrot's staff | |[[Solrot's staff T4]] | ||
|[[File:Solrot's staff T3.png|frameless|30x30px]] | |[[File:Solrot's staff T3.png|frameless|30x30px]] | ||
|Solrot's staff | |[[Solrot's staff T3]] | ||
|[[File:Glowing pyramid.png]] | |[[File:Glowing pyramid.png]] | ||
|[[Glowing pyramid]] | |[[Glowing pyramid]] | ||
| Line 471: | Line 471: | ||
|60 | |60 | ||
|[[File:Solrot's hood T5.png|30x30px|frameless]] | |[[File:Solrot's hood T5.png|30x30px|frameless]] | ||
|Solrot's hood | |[[Solrot's hood T5]] | ||
|[[File:Solrot's hood T4.png|frameless|30x30px]] | |[[File:Solrot's hood T4.png|frameless|30x30px]] | ||
|Solrot's hood | |[[Solrot's hood T4]] | ||
|[[File:Chaos engine.png]] | |[[File:Chaos engine.png]] | ||
|[[Chaos engine]] | |[[Chaos engine]] | ||
| Line 481: | Line 481: | ||
|60 | |60 | ||
|[[File:Solrot's tunic T5.png|31x31px|frameless]] | |[[File:Solrot's tunic T5.png|31x31px|frameless]] | ||
|Solrot's tunic | |[[Solrot's tunic T5]] | ||
|[[File:Solrot's tunic T4.png|frameless|31x31px]] | |[[File:Solrot's tunic T4.png|frameless|31x31px]] | ||
|Solrot's tunic | |[[Solrot's tunic T4]] | ||
|[[File:Chaos engine.png]] | |[[File:Chaos engine.png]] | ||
|[[Chaos engine]] | |[[Chaos engine]] | ||
| Line 491: | Line 491: | ||
|60 | |60 | ||
|[[File:Solrot's leggings T5.png|30x30px|frameless]] | |[[File:Solrot's leggings T5.png|30x30px|frameless]] | ||
|Solrot's leggings | |[[Solrot's leggings T5]] | ||
|[[File:Solrot's leggings T4.png|frameless|30x30px]] | |[[File:Solrot's leggings T4.png|frameless|30x30px]] | ||
|Solrot's leggings | |[[Solrot's leggings T4]] | ||
|[[File:Chaos engine.png]] | |[[File:Chaos engine.png]] | ||
|[[Chaos engine]] | |[[Chaos engine]] | ||
| Line 501: | Line 501: | ||
|60 | |60 | ||
|[[File:Solrot's greatsword T5.png|33x33px|frameless]] | |[[File:Solrot's greatsword T5.png|33x33px|frameless]] | ||
|Solrot's greatsword | |[[Solrot's greatsword T5]] | ||
|[[File:Solrot's greatsword T4.png|frameless|32x32px]] | |[[File:Solrot's greatsword T4.png|frameless|32x32px]] | ||
|Solrot's greatsword | |[[Solrot's greatsword T4]] | ||
|[[File:Chaos engine.png]] | |[[File:Chaos engine.png]] | ||
|[[Chaos engine]] | |[[Chaos engine]] | ||
| Line 511: | Line 511: | ||
|60 | |60 | ||
|[[File:Solrot's crossbow T5.png|32x32px|frameless]] | |[[File:Solrot's crossbow T5.png|32x32px|frameless]] | ||
|Solrot's crossbow | |[[Solrot's crossbow T5]] | ||
|[[File:Solrot's crossbow T4.png|frameless|32x32px]] | |[[File:Solrot's crossbow T4.png|frameless|32x32px]] | ||
|Solrot's crossbow | |[[Solrot's crossbow T4]] | ||
|[[File:Chaos engine.png]] | |[[File:Chaos engine.png]] | ||
|[[Chaos engine]] | |[[Chaos engine]] | ||
| Line 521: | Line 521: | ||
|60 | |60 | ||
|[[File:Solrot's staff T5.png|30x30px|frameless]] | |[[File:Solrot's staff T5.png|30x30px|frameless]] | ||
|Solrot's staff | |[[Solrot's staff T5]] | ||
|[[File:Solrot's staff T4.png|30x30px|frameless]] | |[[File:Solrot's staff T4.png|30x30px|frameless]] | ||
|Solrot's staff | |[[Solrot's staff T4]] | ||
|[[File:Chaos engine.png|x50px]] | |[[File:Chaos engine.png|x50px]] | ||
|[[Chaos engine]] | |[[Chaos engine]] | ||
Revision as of 20:01, 29 May 2024

Invention on RuneSaga is going to be the highlight skill. There are plans to expand it significantly, but right now Invention is used primarily to get AOE gear, at the highest level (Tier 5) it is STRONG, AOE, and will take awhile.. get ready!
How to start Invention
Getting started
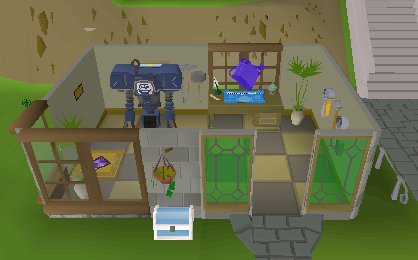
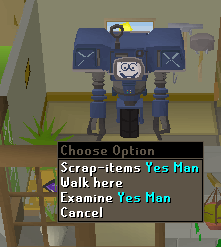
You want to get to level 5 invention immediately. Take any extra barrows pieces you get to this place here.
Scrap barrows items obtained from barrows to gain invention expierence do this untill you are lvl 5 invention.
Base Solrot
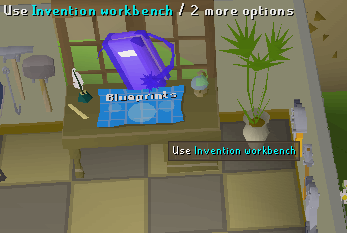
Right next to Scrap-man is the invention workbench
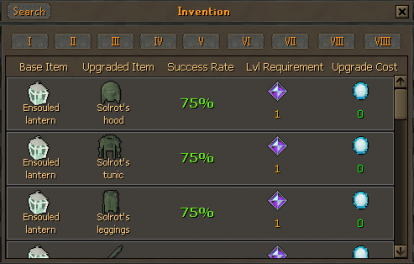
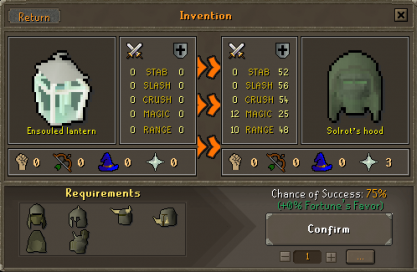
Clicking it you can see all the tiers of Solrot gear available, and a summary of whats required to upgrade each piece.
Clicking in on any piece of gear we can see which ITEMS are required.
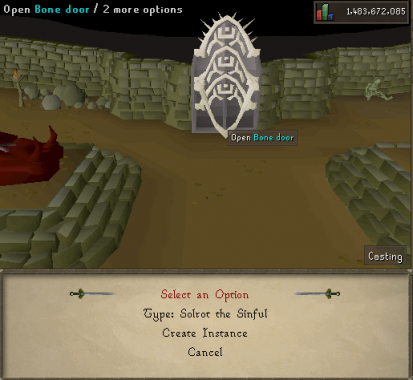
Ensouled Lanterns will come from killing the Solrot boss, which can be found inside the Barrows Crypt here.
You will need an enchanted key from barrows chests to get a 5 minute respawnable instance of Solrot the Sinful. It will require prayer, he attacks with multiple styles.
Upgrades
Tier I
Level |
Upgrade | Base item | Materials | Sucess rate | Upgrade cost | |||
|---|---|---|---|---|---|---|---|---|
| 1 | Solrot's hood | Ensouled lantern | 75% | Free | ||||
| 1 | Solrot's tunic | Ensouled lantern | 75% | Free | ||||
| 1 | Solrot's leggings | Ensouled lantern | 75% | Free | ||||
| 1 | Solrot's greatsword | Ensouled lantern | 60% | Free | ||||
| 1 | Solrot's crossbow | Ensouled lantern | 35% | Free | ||||
| 1 | Solrot's staff | Ensouled lantern | 35% | Free | ||||
| 1 | Barrows gloves | Ensouled lantern | 75% | Free | ||||
| 60 | Berserker ring (i) | Berserker ring | 20% | |||||
| 60 | Seers ring (i) | Seers ring | 20% | |||||
| 60 | Archers ring (i) | Archer ring | 20% | |||||
| 60 | Warrior ring (i) | Warrior ring | 20% | |||||
Tier II
Level |
Upgrade | Base item | Materials | Sucess rate | Upgrade cost | |||
|---|---|---|---|---|---|---|---|---|
| 5 | Solrot's hood T1 | Solrot's hood | Deathcap | 55% | ||||
| 5 | Solrot's tunic T1 | Solrot's tunic | Deathcap | 55% | ||||
| 5 | Solrot's leggings T1 | Solrot's leggings | Deathcap | 55% | ||||
| 5 | Solrot's greatsword T1 | Solrot's greatsword | Deathcap | 55% | ||||
| 5 | Solrot's crossbow T1 | Solrot's crossbow | Deathcap | 55% | ||||
| 5 | Solrot's staff T1 | Solrot's staff | Deathcap | 55% | ||||
Tier III
Level |
Upgrade | Base item | Materials | Sucess rate | Upgrade cost | |||
|---|---|---|---|---|---|---|---|---|
| 15 | Solrot's hood T2 | Solrot's hood T1 | Titanium claw | 55% | ||||
| 15 | Solrot's tunic T2 | Solrot's tunic T1 | Titanium claw | 55% | ||||
| 15 | Solrot's leggings T2 | Solrot's leggings T1 | Titanium claw | 55% | ||||
| 15 | Solrot's greatsword T2 | Solrot's greatsword T1 | Titanium claw | 55% | ||||
| 15 | Solrot's crossbow T2 | Solrot's crossbow T1 | Titanium claw | 55% | ||||
| 15 | Solrot's staff T2 | Solrot's staff T1 | Titanium claw | 55% | ||||
Tier IV
Level |
Upgrade | Base item | Materials | Sucess rate | Upgrade cost | |||
|---|---|---|---|---|---|---|---|---|
| 30 | Solrot's hood T3 | Solrot's hood T2 | Colossal fang | 35% | ||||
| 30 | Solrot's tunic T3 | Solrot's tunic T2 | Colossal fang | 35% | ||||
| 30 | Solrot's leggings T3 | Solrot's leggings T2 | Colossal fang | 35% | ||||
| 30 | Solrot's greatsword T3 | Solrot's greatsword T2 | Colossal fang | 35% | ||||
| 30 | Solrot's crossbow T3 | Solrot's crossbow T2 | Colossal fang | 35% | ||||
| 30 | Solrot's staff T3 | Solrot's staff T2 | Colossal fang | 35% | ||||
| 30 | Ring of precision | Ring of wealth (i) | Coins | 25% | ||||
| 30 | Ring of greed | Ring of wealth (i) | Coins | 25% | ||||
Tier V
Level |
Upgrade | Base item | Materials | Sucess rate | Upgrade cost | |||
|---|---|---|---|---|---|---|---|---|
| 45 | Solrot's hood T4 | Solrot's hood T3 | Glowing pyramid | 25% | ||||
| 45 | Solrot's tunic T4 | Solrot's tunic T3 | Glowing pyramid | 25% | ||||
| 45 | Solrot's leggings T4 | Solrot's leggings T3 | Glowing pyramid | 25% | ||||
| 45 | Solrot's greatsword T4 | Solrot's greatsword T3 | Glowing pyramid | 25% | ||||
| 45 | Solrot's crossbow T4 | Solrot's crossbow T3 | Glowing pyramid | 25% | ||||
| 45 | Solrot's staff T4 | Solrot's staff T3 | Glowing pyramid | 25% | ||||
Tier VI
Level |
Upgrade | Base item | Materials | Sucess rate | Upgrade cost | |||
|---|---|---|---|---|---|---|---|---|
| 60 | Solrot's hood T5 | Solrot's hood T4 | Chaos engine | 15% | ||||
| 60 | Solrot's tunic T5 | Solrot's tunic T4 | Chaos engine | 15% | ||||
| 60 | Solrot's leggings T5 | Solrot's leggings T4 | Chaos engine | 15% | ||||
| 60 | Solrot's greatsword T5 | Solrot's greatsword T4 | Chaos engine | 15% | ||||
| 60 | Solrot's crossbow T5 | Solrot's crossbow T4 | Chaos engine | 15% | ||||
| 60 | Solrot's staff T5 | Solrot's staff T4 | Chaos engine | 15% | ||||
| 60 | Molten amulet (i) | Molten amulet | Ragefire ruby | 20% | ||||
| Molten tokkul | ||||||||
| 60 | Atomic amulet (i) | Atomic amulet | Everbane emerald | 20% | ||||
| Atomic tokkul | ||||||||
| 60 | Cold fusion amulet (i) | Cold fusion amulet | Soulless sapphire | 20% | ||||
| Cold fusion tokkul | ||||||||
| 60 | Hellion slayer helmet | Slayer helmet (melee) | Slayer ring | 20% | ||||
| Magic fragments | ||||||||
| 60 | Deadeye slayer helmet | Slayer helmet (ranged) | Slayer ring | 20% | ||||
| Ranged fragments | ||||||||
| 60 | Occult slayer helmet | Slayer helmet (magic) | Slayer ring | 20% | ||||
| Magic fragments | ||||||||
Invention Zones
Wildshroom woods
| Level | Monster | |
|---|---|---|
| 5 | 
|
Tan Mushroom |
| 5 | 
|
Grey Mushroom |
| 5 | 
|
Yellow Mushroom |
| 5 | 
|
Orange Mushroom |
| 5 | 
|
Blue Mushroom |
| 5 | 
|
Purple Mushroom |
| 5 | 
|
Dark Mushroom |
| Level | Boss | |
| 5 | 
|
Megamush |
Mashup Mayhem
You can find the following monster and boss here
| Level | Monster | |
|---|---|---|
| 15 | Purple Ewok | |
| 15 | Blue Ewok | |
| 15 | Orange Ewok | |
| 15 | Red Ewok | |
| Level | Boss | |
| 15 | Ewok Commander | |
Ghost Grid
You can find the following monster and boss here
| Level | Monster | |
|---|---|---|
| 30 | Red Ghost | |
| 30 | Pink Ghost | |
| 30 | Cyan Ghost | |
| 30 | Orange Ghost | |
| 30 | Green Ghost | |
| 30 | Black Ghost | |
| Level | Boss | |
| 30 | 
|
Pac-Man |
Unknown Underworld
You can find the following monster and boss here
| Level | Monster | |
|---|---|---|
| 45 | Unown D | |
| 45 | Unown I | |
| 45 | Unown S | |
| 45 | 
|
Unown C |
| 45 | 
|
Unown O |
| 45 | Unown V | |
| 45 | Unown E | |
| 45 | Unown R | |
| Level | Boss | |
| 45 | 
|
Ancient Mew |
Clockwork Coliseum
You can find the following monster and boss here
| Level | Monster | |
|---|---|---|
| 60 | 
|
Bronzebot |
| 60 | Iron Bot | |
| 60 | Mith Bot | |
| 60 | Adamant Bot | |
| 60 | Rune Bot | |
| 60 | Dragon Bot | |
| Level | Boss | |
| 60 | Robo Capone | |
Strategy
My strategy would be to keep grinding zones and scrap ingredients at Yes-man.
When you are at the unknown underworld zone i would keep staying as long as you could at each unknown monster to get as much ingredients to scrap for invention exp.
This would be the fastest way to get 99 invention.
